My Homelab server setup 2024v1.0
Welcome to this blog on how I built my first Homelab server and started my self-hosting journey. Here, I am going to walk you through the process of buying and configuring an affordable mini-server that packs quite a punch for what it is.
Why did I decide to build a Homelab?
As a software engineer, I often find myself deploying local development environments on my machines. The problem is, I usually don’t use my computers just for development. For that reason, when I am done writing code, I often bring down most of the environment components to release computing resources for other workloads. And I do all that just to repeat everything the next time I need to test something. At some point, I remember thinking of ways how I could optimize my environment management approach so that I could permanently deploy and use it whenever I needed to.
And just like that, after spending several months down the self-hosting research rabbit hole, I came up with the idea of building my server. This time I had even more possible use cases and ideas in mind, like hosting my pet projects (see you later, cloud cost anxiety), storing and sharing files across my machines, hosting my own VPN server, and even, possibly, doing fun stuff, like deploying home automations.
So, enough for the “why”! Let’s get into the “how”.
Goals and restrictions
Before I take you along on my first adventure into the Homelab abyss, let’s set our course straight. I feel it’s important to state the goals and restrictions I had in mind when starting my self-hosting journey. Here they go:
- Form factor: Mini server, SBC (single-board computer) based. I’ll explain the reason behind this choice a bit later.
- OS: Linux. I’ve been wanting to start using it for a while. In addition, SBCs are, unfortunately, not known for being extremely powerful, so Linux felt like a great choice considering the amount of available lightweight distributions. I also knew right away that I wanted to host pretty much everything in Docker. So why jump through hoops and do something like hosting a Linux subsystem on Windows, if I can just run Linux.
- Low price: Keep the budget under 150 - 200$, shipping excluded. Something easy to build up homelabing skills on with little risk to my wallet.
- Easy to set up: I would love the server to be easy to set up and maintain since it was my first experience with both self-hosted servers and Linux.
- Containerization: Must be able to run 10 to 15 fairly lightweight Docker containers (mostly, my pet projects), as well as an SQL database (preferably, PostgreSQL), since I wanted to move part (or all) of my personal development infrastructure (nothing too compute intensive) away from my laptop so that I could use it across all my machines.
- Low power consumption: Must ideally consume under 10W, since it is going to run 24/7.
- Low noise: Ideally, no fan noise whatsoever, since it is going to be installed on my desk - surely would be nice to not have to listen to my server launching into space all day long.
- Recoverability: Should be able to automatically restore operation and deployments in case of power cuts.
- Basic NAS(ish) capabilities: Must be able to serve as storage for stuff like Docker images, packages, and other symbols I wanted to share across my machines.
Let me start by explaining the form factor choice first. I am sure, it might sound confusing and suboptimal to potentially spend up to 200$ on a single-board computer, when someone patient and willing to spend a couple of days scouting their local second-hand hardware marketplaces can easily buy a full-fledged desktop computer which, even though, most likely, going to be pretty outdated, can still deliver so much more in terms of performance, maintainability, and convenience.
However, not everything we do in life we do because it makes the best sense - sometimes we do silly things because they are fun. As a software engineer and a tech enthusiast, I enjoy challenges that require nontrivial solutions. I believe this approach to be the best way to learn stuff and have fun doing it. And what better way to find problems to solve if not embracing ARM-based SBCs in all their glory? Especially, considering some of the limitations they come with.
Sure, I sacrifice modularity, repairability, and upgradability, among other things. At the same time, it is just my first server. It is something I am going to build up my skills with to later move on to more powerful and versatile machines. And the great thing about SBCs is that they can be easily repurposed for countless other hardware projects after being retired from their server duties.
Buying the hardware
What I bought
Here is the list of hardware I ended up buying (Nov - Dec 2023, shipping excluded):
| Item name | Model | Details | Quantity | Price (USD) |
|---|---|---|---|---|
| SBC | Raspberry Pi 4 | 4GB, model B | 1 | 55 |
| Power supply | Official, Raspberry Pi | 15W USB-C, 5.1 V 3.0 A | 1 | 8 |
| MicroSD card | SanDisk Ultra | 32GB, Class 10 | 1 | 9 |
| SBC case | Official, Raspberry Pi | Black / Gray | 1 | 5 |
| SBC case fan | Official, Raspberry Pi | PWM speed control | 1 | 5.95 |
| SSD to USB 3.0 Cable | N/A | ASMedia ASM1153E/ASM225 chip | 2 | 7.95 |
| SSD Drive | Patriot BURST ELITE | 120GB SATA3 2.5” | 1 | 17 |
| SSD Drive | Patriot BURST ELITE | 240GB SATA3 2.5” | 1 | 21 |
| SSD mounting bracket | UCTRONICS U6158 | Vertical, 2 slots | 1 | 16.99 |
| Network switch | TP-Link TL-SF1005D | Tabletop, 5-port, unmanaged | 1 | 11 |
| Total | ~ 165 |
Why I bought what I bought
First and foremost, yes, absolutely, the SSD mounting bracket was a nice-to-have item - not a required one. I just wanted my SSDs to be mounted to the Pi securely (as a single unit) while looking neat at the same time. I gave myself some slack there - it is a hobby after all. The same, probably, goes for the second (240GB) drive. I bought it not out of necessity, but convenience since I still was in a comfortable place when it came to the budget. There were multiple reasons behind it, the main being to not use the same drive as a boot device and a drive for my network file-sharing shenanigans.
Said all that, it seems like, realistically if one would try and reproduce the same setup in a more cost-efficient way, they would be easily able to shave off at least around 38$ bringing the total price down to approx. 130$. Of course, the total price does not include tools, like screwdrivers and an RJ-45 crimper, which I already owned, and CAT cable since I already had some leftovers from previous projects.
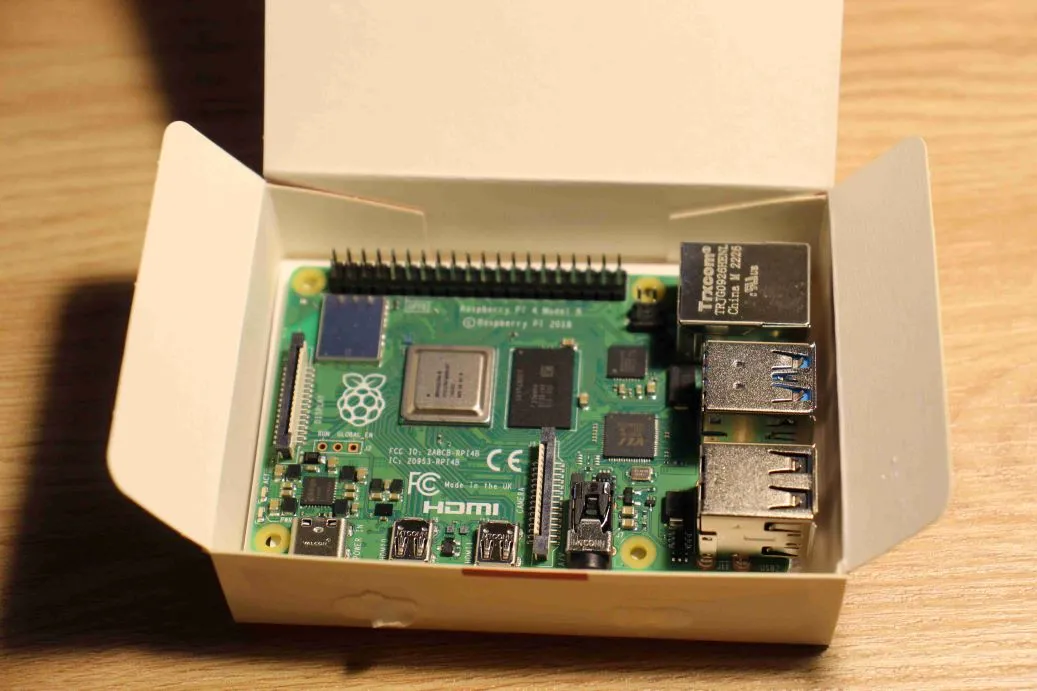 Raspberry Pi 4 fresh out of the box
Now, to the star of the show - Raspberry Pi 4. Why not Raspberry Pi 5 you might ask? Fair question, especially considering the negligible price difference - 5$ for the same RAM configuration (4GB). The answer is very simple. It was early Nov 2023. Most authorized resellers sent out the first Pi 5 pre-order batches just a week ago with no clear timeline on when the Pis are going to be available in stock again. The choice was buying a Pi 4 now or hopefully getting a Pi 5 sometime in the next 2 - 3 months. So I decided to just bite the bullet on this one and go with Pi 4. Sure it would have been nice to have a noticeably better CPU, GPU (and much more) for virtually the same price, but Pi 4 seemed to be good enough for my purposes as it is.
Why not 8 GB? I did not think I might ever need more than 4GB for my use case (hosting fairly lightweight Docker containers, no virtualization). And it seems to be working out just fine so far. Just had to choose the right Linux distribution. More on that later.
Researching Raspberry Pi 4 compatible SSD drives and SATA to USB 3.0 adapters was an adventure of its own. You can find a whole dedicated blog entry here.
OS and hardware configurations
Linux: Headless or GUI?
As a software engineer, I am comfortable with CLI tools, but I am not a Linux terminal ninja. Not yet anyway. Hopefully, someday I will grow into one. Until then I am probably going to stick to not running my homelab server headless. At the same time, due to the way I set up my environment (described below) I rarely have to remote desktop into the server. I just regularly SSH into it to update packages. So, the switch to headless might not be as far into the future as I think it is after all.
Linux: Distribution
When it comes to Linux distros with GUI for Raspberry Pi 4 there seems to be no better fit than Raspberry Pi OS (current version based on Debian 12 “Bookworm”). It is optimized for the hardware and comes equipped with various useful tools specific to working with RPis.
It offers 3 versions:
- Raspberry Pi OS with desktop.
- Raspberry Pi OS with desktop and recommended software.
- Raspberry Pi OS Lite.
I went with the second one. However, I did try my luck with Ubuntu 22.01.3 LTS + GNOME first. The experience was not that great. RPi 4 did generally okay but struggled noticeably at times. The final nail in the coffin was idle RAM usage: 900 - 1000 MB (clean install).
My current setup on Raspberry Pi OS consumes around 500 - 600 MB idle, running an Xorg server, a native PostgreSQL server instance, and Docker (engine + 2 containers).
Configurations
I used Raspberry Pi Imager to install Raspberry Pi OS with desktop and recommended software via a MicroSD card. Then I used GParted to partition my SSDs and turned one of them into the main boot media by cloning the card onto it using the out-of-the-box SD Card Copier tool. I also had to use the raspi-config tool to enable boot from external media and enable PWM control for the case fan. You can read more about the whole process in a dedicated blog entry here.
What am I running so far
Here is my current baseline setup. Everything that I currently host is free one way or another (either generally free or offers a free community edition version).
Natively installed
- Xorg: Establish remote desktop connections from my Windows based machines.
- PostgreSQL: Raspberry Pi OS being based on Debian makes the installation very straightforward. Since this database engine is available on all Debian versions by default, it can be simply installed directly from the Raspbian package repository. I installed it natively due to better reliability and data integrity as well as less complexity, and fewer unknowns in the stack because I kind of want my data to stick around.
- Docker engine.
Running in Docker
- pgadmin4 Desktop (PostgreSQL DBMS): In opposition to PostgreSQL database engine, unfortunately, pgadmin4 Desktop for Linux does not support ARM architecture. Therefore, I have to run it in a Docker container. But it is alright, though. The reason is that I want the pgadmin4 admin panel to be accessible via web browsers on any of my local machines without having to remote desktop into the server. Therefore, I would run it in Docker anyway.
- Portainer Community Edition (container management): A powerful lightweight replacement for Docker Desktop. It offers countless awesome features, but the one that sealed the deal for me personally is the fact that it is web-based. This allows me to run it in Docker and have it available across all my local machines via a browser - no need to remote desktop into the server to manage containers.
Outcome
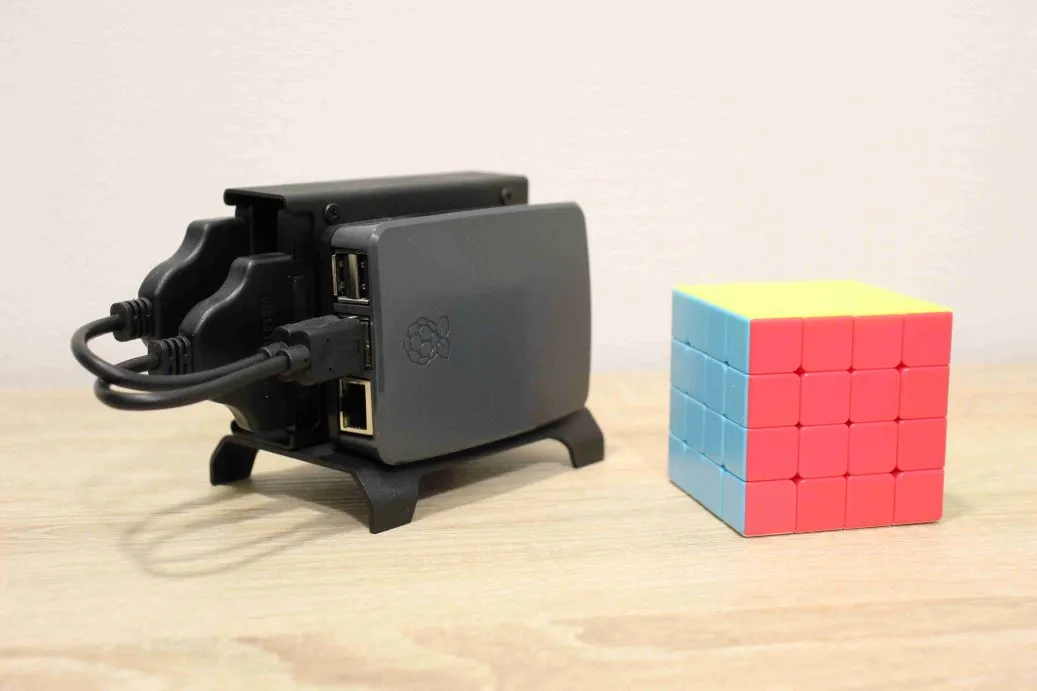 4x4 Rubik’s Cube (65 mm sides) for size comparison
Now let’s see how my actual setup compares against the original goals/requirements and how it holds up so far after around 2 months of operation:
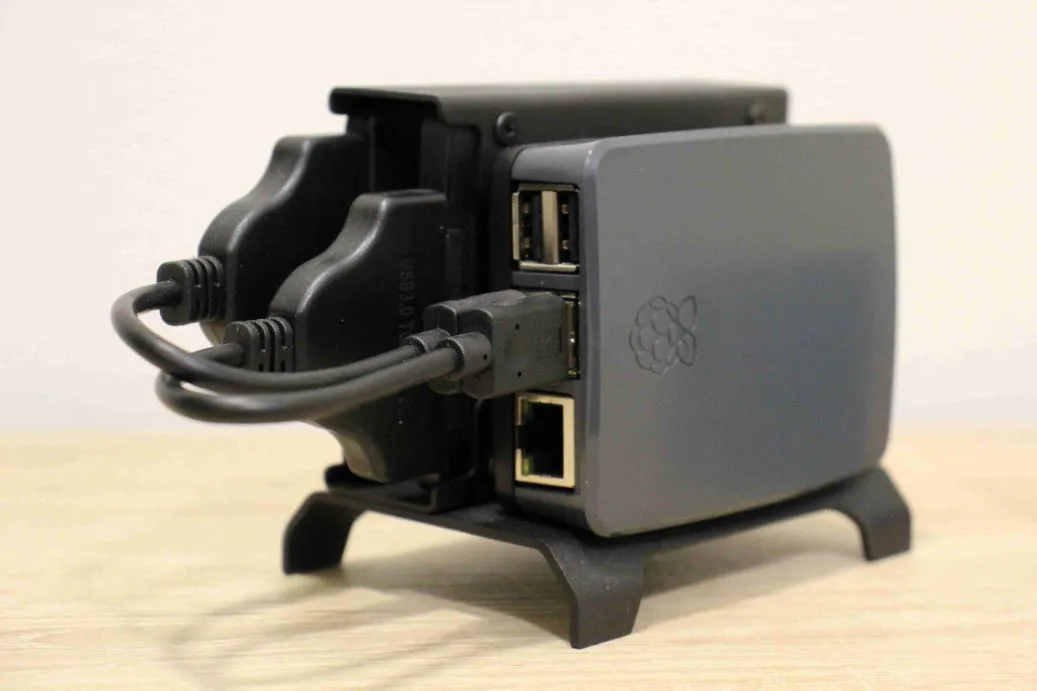
- Form factor: Credit card-sized SBC Raspberry Pi 4 Model B, overall server dimensions around 70x110x90 mm (WxDxH).
- OS: Raspberry Pi OS (current version based on Debian 12 “Bookworm”).
- Low price: ~ 130$ - 165$.
- Easy to set up: Raspberry Pi OS, Raspberry Pi Imager, SD Card Copier,
raspi-configalong with comprehensive documentation and great community support. - Containerization: Docker Engine + Portainer.
- Low power consumption: I was not able to measure the exact power consumption just yet due to a lack of specialized equipment. At the same time, RPI 4 is rated for the power input of 15 W (5V 3A), approx. 6 of which are reserved for USB peripherals (5V 1.2A). This leaves 9 W for the board itself. Based on benchmarks available on the Internet, it consumes around 2.7 W idle. Considering my usual CPU and RAM unitization percentage (~ 4 - 5 % CPU, 13 - 16 % RAM) I doubt the server ever draws more than 10 W, including the power consumed by the SSDs.
- Low noise: Zero noise with current workloads. The fan can be only heard during startups.
- Recoverability: Raspberry Pi 4 does not have a power button. For that reason, it turns on automatically as soon as power is restored. Docker Engine starts automatically, container restart policy is set to ‘Always’. No manual intervention is needed.
- Basic NAS(ish) capabilities: Nothing too fancy, a simple network-shared folder. For now anyway.
So far the setup seems to tick all the boxes for me. Is it a good setup? I honestly don’t know. But what I do know is that it is a lot of fun!
What is next?
- Pi-Hole: Network-level ad-blocking.
- VPN: Remote access to my home network (still researching security).
- Self-hosted container image registry?
- Home Assistant?
- Some much more!
Wrap Up
I hope you found my experience useful and encouraging. If you are thinking about getting into homelabing - just do it! Trust me, you will wonder why you didn’t start sooner. There is no perfect time, or the perfect hardware to start with. Just start small and grow together with your setup. And then, hopefully, homelabing will bring you as much joy, experience, and knowledge as it does to me. The community support is just awesome, as well as the community itself. Feel free to reach out to me in case of any questions, to share feedback, or just your progress.
Useful URLs
- https://www.raspberrypi.com/products/raspberry-pi-4-model-b/
- https://www.raspberrypi.com/software/
- https://www.raspberrypi.com/documentation/computers/configuration.html
- https://www.x.org/wiki/
- https://www.postgresql.org/download/linux/debian/
- https://www.pgadmin.org/docs/pgadmin4/development/desktop_deployment.html
- https://hub.docker.com/r/dpage/pgadmin4/
- https://docs.portainer.io/start/install-ce
- https://docs.docker.com/engine/